Imagine your organization is working on a high-end application project. You are tolling day and night to bring the client’s ideas true. Finally, the day comes when you are about to hand over the project. And the client bursts your happiness bubble as the application created was something that they were not looking for. Guess what, now your months of hard work have gone down the drain. Only if you had made use of wireframing. The term may sound fancy, but it is pretty simple to use and the outcome it gives, makes work more presentable and saves you from last-minute heartaches. In this blog, we will walk you through the wireframing basics and a step-by-step guide for creating mobile app wireframes.

What is wireframing for mobile apps?
It is a static low to high fidelity simulation of a product. Wireframing is a two-dimensional sketch that is one of the most crucial steps in app development. It gives a visual representation of the prototype, that converts an idea into a finished product. It displays all the important features, functionalities, and vital steps of the application. To be precise, a wireframe is not the end product, rather it is a blueprint or a schematic diagram that contains the essential elements. Owing to its features, the wireframe will bring clarity, and surely provides a direction and scope which is beneficial for the success of the mobile application.Top 4 benefits of wireframe in mobile app development
Benefit #1: Gives clarity
Developing any product is a herculean task. And to reach the expected result, one needs precision. Using a wireframe gives a purpose to your product. It provides a full-proof plan that defines the vision and outcome that is intended. The visual representation it provides helps one succeed by understanding the flow of the project, resolving, and identifying errors, etc.
Benefit #2: Makes efficient use of resources
The ideal situation is when a business can thrive on low investment and in return gives a higher profit. Using a wireframe for mobile app development saves time and money. This further boosts the programming stage sinching in the time required to finish the project. As it helps in minimizing the errors at an early stage, it puts an end to the cost that comes in the later stage of the development.
Benefit #3: Provides a target driven approach
For a developer to hand over a product that is loved by all, they need to first step into the shoes of the users and understand their demands. Wireframing provides them with an opportunity to do so.
Benefit #4: Minimizes errors
While it brings clarity to your project, it also helps in minimizing the errors at an early stage. As the wireframing is divided into parts and after the completion of each segment, you have can have a meeting with your client to see if you have met their needs. This whole process essentially makes sure that they are no errors at the end of the project.
Here’s how you can create mobile app wireframes
We have streamlined this process, and in eight simple steps, one can easily create mobile app wireframes.
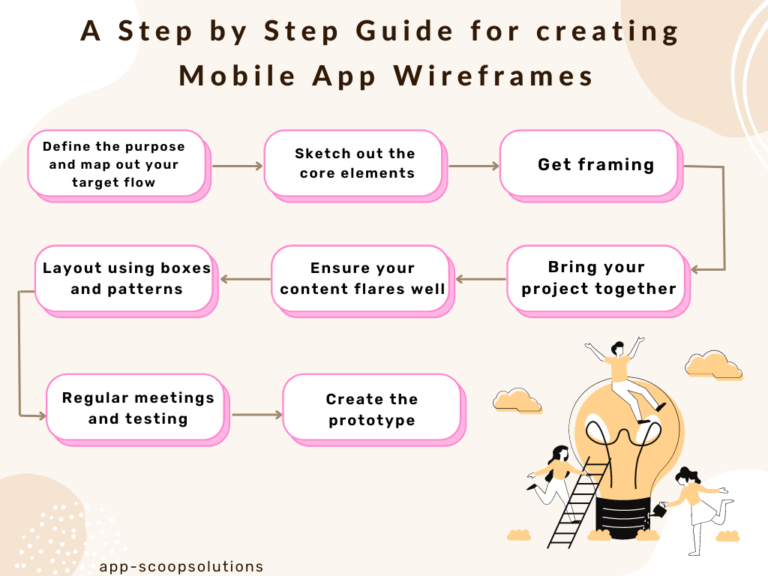
1. Define the purpose and map out your target flow
The foundation of the project becomes stronger once you narrow down on the purpose. It gives meaning to your project, pushes you to be creative, and serves as a means to explore the unexplored. Every project is different! Depending on that put together the best team who will make sure that the project turns out to be a success. Now, the next step is to chalk out the user flow. You can draw it using a simple pen and paper. Begin by finding the answers:
• The total number of screens?
• The product’s target audience?
• How should the users interact with the screens?
• What is the expectation from the app?
Convert the above answers into a basic diagram using boxes, arrows, and other basic shapes. Not all users will follow the same path. The flow may not be always linear. Hence, it is always better to get into the shoes of the user to analyse the flowchart.
2. Sketch out the core elements
The second step will define the flow of your project. Sure there are several prototyping tools available, but sticking to a pen and paper will provide you with the best results. As you have your product’s purpose and goals already penned down with you, half of the second stage’s work is done.
Now, you have to visualize that, wear your creative hat, and explore the design. Sketching at this stage gives a structure to your project. There should be a sketch for every screen. Brainstorm with your team members and get the best sketch done.
3. Get framing
Now is the time to convert the visuals into frames. This step will further strengthen the foundation. Try opting for low or mid-fidelity wireframes. Depending on the platform, set a mobile frame. Setting a mobile frame will give the visuals a better structure. Don’t put a lot of elements on the screen. Keeping it simple will help the project go a long way.
4. Layout using boxes and patterns
More than the content, the purpose of this stage is to devise the structure of the wireframe. This stage also gives the designer a visual hierarchy. Consider all the ifs and buts of how a user will approach the app. Depending on that make use of the boxes and arrows to get a clear idea of the page. The size of the pattern or the box should depend on the importance of the elements. The flow should be keeping in mind that it offers the best UX. Here using the familiar UI puts the user at ease. However, presenting it uniquely shows your originality. At this stage, using the Andriod and iOS native design patterns will be good for the designers. Using design patterns solves the problems of global navigation.
Before you begin stage 5, make sure that you replace all the dummy content for obvious reasons. Once that is done, see if the flow is as per your desired goal. Filling in the actual copy is the best way to communicate at this stage.
5. Ensure your content flares well High Standards
By now, we’d say 60 per cent of the work is done. At this stage, you’ll have to keep a keen eye on how the content flares on different platforms. Content designed for iPhone 12 Pro won’t do justice when viewed on iPhone SE. The key is to check how the content feels on different screen sizes too.
6. Bring your project together
Although your project has come near fruition, it is still incomplete as the screen are not connected. Numbering each screen allows the UX flows to analyse if there are any missing links. This stage will allow the team to understand the overall flow of the app and its functions.
7. Regular meetings and testing
As per us, there should be group meetings at every stage. This helps in minimizing the errors, keeps the team connected, and gives you a clear idea if you are staying up to the client’s expectations. Testing your work at every stage adds to your credibility. And testing especially at this stage will bring the whole project together. Test all your designs and their functions. See if there are any missing loops, and analyse how the screen interacts. By now, most of the work is done. Before moving on to the last step make sure that the app is cohesive and refined.
8. Create the prototype
Well, the time has finally come when your design will come to life. Now, transform the wireframe into a prototype. Keep interacting with the screens to see if they are up to the mark. Let every person from the team go through the app, take their feedback, and work on perfecting the app. If you are 100 per cent sure, the project is ready for handover. However, your work just does not end there. You ought to provide the best customer service, as it defines your organization’s reputation. The app stays alive only if it woos the customers and users. And for that, don’t let a single stone unturned.